loading and displaying a 3D mesh with regl

this tutorial deals with writing programs to render 3D models in the browser.
we will:
- define a 3D mesh
- look at how a 3D mesh is encoded
- write a program that can load a 3D mesh and display it in a webgl scene
- share some tips n trix for working with 3D meshes
we will be using the languages javascript and glsl, the regl framework for webgl, and browserify.
meshes
In 3D graphics a mesh is a collection of points ("vertices"), lines ("edges"), and in this example, triangles ("faces") that describe a 3D shape.
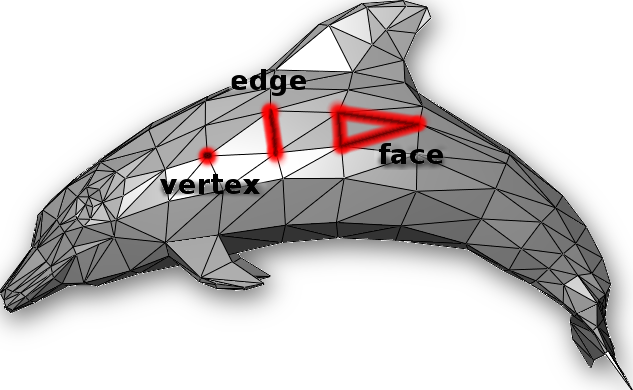
given the positions of every vertex and how all the vertices should connect to each other, the computer can draw the dolphin.
but how do you store the list of all the vertices, edges, and faces that make up the dolphin?
we use an array of all the points and a separate array that says which points should connect to which:
position: a point in 3D space specified by an [x, y, z] coordinate.cell: a set of 3 points from thepositionlist that when connected, form a triangle. items in the first list are referenced by index in the array, eg [134,17,567].
in javascript, it should look something like this:
{
  positions: [
    [ -0.8090169943749475, 0.5, 0.3090169943749474 ],
    [ -0.5, 0.3090169943749474, 0.8090169943749475 ],
    [ -0.3090169943749474, 0.8090169943749475, 0.5 ],
    [ -0.5257311121191336, 0.85065080835204, 0 ],
    // ...
  ],
  cells: [
    [ 3, 0, 2 ],
    [ 4, 1, 0 ],
    [ 5, 2, 1 ],
    [ 0, 1, 2 ],
    // ...
  ]
}
this data structure is called a simplicial complex. this format is common in the regl/stackgl ecosystem. one reason for this is that you can store it in json format or as a javascript object.
with cell and position data, we can write a program to draw the shape described by the data.
(for an alternative explanation of the above, check out "3D Representation" by Catherine Leung)
(for an excellent intro to triangles in 3D computer graphics, check out the computerphile video "a universe of triangles" (11min)).
sources of data
now that we know what meshes are and how they are specified, we can figure out where to get them.
meshes can be drawn in a 3D modeling program like blender or generated (eg: icosphere).
there are meshes out there for all kinds of things, meaning that instead of figuring out how to model a dolphin, you may be able to use dolphin geometry that already exists.
here are a few places where you can get meshes:
- the stanford 3D scanning repository
- NASA
- yobi3D - free 3D model search engine
- Clara.io - most items are not liberally licensed; obj and stl files
- free3d
- thingiverse - there are many models here, but they are mostly stl files because cnc mills & 3D printers expect stl
code
for this example
we'll be loading and drawing a model of a skeleton.
the file skelly.json has the data for the skelly mesh in a
simplicial complex json object.
here's just a bit of what the data looks like:
{
  "cells": [
    [ 4, 0, 16 ],
    [ 4, 16, 22 ],
    [ 5, 23, 17 ],
    // ...
  ],
  "positions": [
    [ -0.100101, 35.610737, 1.465592 ],
    [ 0.099947,
    // ...
  ]
}
in the below program we use the regl framework for webgl to create and render the scene.
once we run this program through a few other programs (see: usage), we'll get an html file that when opened in a browser, will have our interactive webgl scene showing a 3d skeleton on a black background.
var regl = require('regl')()
var mesh = require('./skelly.json')
var mat4 = require('gl-mat4')
var normals = require('angle-normals')
var camera = require('regl-camera')(regl, {
  center: [0, 20, 0],
  distance: 50
})

function skelly (regl){
  return regl({
    frag: `
      precision mediump float;
      varying vec3 vnormal;
      void main () {
        gl_FragColor = vec4(abs(vnormal), 1.0);
      }`,
    vert: `
      precision mediump float;
      uniform mat4 model, projection, view;
      attribute vec3 position, normal;
      varying vec3 vnormal;
      void main () {
        vnormal = normal;
        gl_Position = projection * view * model * vec4(position, 1.0);
      }`,
    attributes: {
      position: mesh.positions,
      normal: normals(mesh.cells, mesh.positions)
    },
    elements: mesh.cells,
    uniforms: {
      model: function(context, props){
        var rmat = []
        var rmati = mat4.identity(rmat)
        var theta = context.time
        mat4.rotateY(rmati, rmati, theta)
        return rmat
      }
    },
    primitive: "triangles"
  })
}
var draw = {
  skelly: skelly(regl)
}
regl.frame(function() {
  regl.clear({
    color: [0, 0, 0, 1]
  })
  camera(function() {
    draw.skelly()
  })
})
in the above program, this is where we load skelly.json:
var mesh = require('./skelly.json')
if you have your own 3D mesh in simplicial complex json form in its own file, this is where you'd substitute your own file name.
the rest of the program does the work of displaying the mesh. it sets up a regl scene, camera, colors, rotation, and more.
frag is a fragment
shader, a program that sets
the color for every pixel on the screen.
vert is a vertex
shader. this program
determines how every vertex in the 3d space of the scene should be displayed on
the 2d screen of the computer (aka in "screen coordinates").
vert and frag are
written in glsl, and the rest of the program is in javascript.
the cell and position data gets piped into your program in
the attributes area:
  attributes: {
    position: mesh.positions,
    normal: normals(mesh.cells, mesh.positions)
  },
  elements: mesh.cells,
  // ...
once your program has access to that data, you can perform mathematical operations on the entire dataset, meaning that you can manipulate your shape in a huge number of ways.
manipulating the mesh
with webgl there are many ways to achieve similar outcomes and many, many ways to add effects and variations to enhance your 3D scene.
for example, here's a scene that takes the same
skelly.json data and applies a whole lot of modifications:
var regl = require('regl')()
var skelly = require('./skelly.json')
var mat4 = require('gl-mat4')
var normals = require('angle-normals')

var camera = require('regl-camera')(regl, {
  center: [0, 20, 0],
  distance: 50
})

var drawskelly = regl({
  frag: `
    precision mediump float;
    varying vec3 vnormal;
    vec3 hsl2rgb(vec3 hsl) {
      vec3 rgb = clamp( abs(mod(hsl.x*2.0+vec3(0.0,4.0,2.0),6.0)-3.0)-1.0, 0.0, 1.0 );
      return hsl.z - hsl.y * (rgb-0.5)*(3.0-abs(2.0*hsl.y-1.0));
    }
    void main () {
      gl_FragColor = vec4(hsl2rgb(abs(vnormal)), 1.0);
    }`,
  vert: `
    precision mediump float;
    uniform mat4 model, projection, view;
    attribute vec3 position, normal;
    varying vec3 vnormal;
    uniform float t;
    vec3 warp (vec3 p){
      float r = length(p.zx);
      float theta = atan(p.z, p.x);
      return vec3 (r*cos(theta), p.y, r*sin(theta)) +
      vnormal+(1.0+cos(t+p.z));
    }
    void main () {
      vnormal = normal;
      gl_Position = projection * view * model *
      vec4(warp(position), 1.0);
    }`,
  attributes: {
    position: skelly.positions,
    normal: normals(skelly.cells, skelly.positions)
  },
  elements: skelly.cells,
  uniforms: {
    t: function(context, props){
         return context.time
    },
    model: function(context, props){
      var theta = context.time
      var rmat = []
      return mat4.rotateY(rmat, mat4.identity(rmat), theta)
    }
  },
  primitive: "triangles"
})

regl.frame(function() {
  regl.clear({
    color: [0, 0, 0, 1]
  })
  camera(function() {
    drawskelly()
  })
})
there are modifications in color, position, and more, all based off the original skeleton mesh. the original mesh data is never lost, it's just used to drive what you end up seeing in the scene.
usage
now that we get the basic elements of a webgl program that displays a mesh, let's look at some specifics.
the below instructions expect you to be familiar with git, bash (aka "command line"), npm, and browserify.
the first section will let you quickly demo the code and see it in the browser. the second shows how to generate a standalone html page that you can upload or send wherever you want!
installation
files for this example are located at https://github.com/mk30/mesh-tutorial-example.
on the command line, cd to wherever you like to put your
programming projects, then do:
git clone https://github.com/mk30/mesh-tutorial-example.git
(if you have github set up with ssh, use git@github.com:mk30/mesh-tutorial-example.git)
cd to mesh-tutorial-example
do npm install
demo
once you've installed, type:
budo skelly.js
if you get errors, you'll have to resolve them first, but if all works well, you should see something like:
[0001] info  Server running at http://127.0.0.1:9966/
(connect)
if you visit that url in your browser (you can also go to
localhost:9966), you should see the skeleton from the first
example.
to see the warped skeleton demo do:
budo skellywarped.js
generate an html file
to generate an html file of the basic skeleton, do:
browserify skelly.js | indexhtmlify > skelly.html
to generate an html file of the warped skeleton:
browserify skellywarped.js | indexhtmlify > skellywarped.html
mesh problems
file formats
meshes come in many different formats. for example, for a single model on clara.io, here are all the formats available:
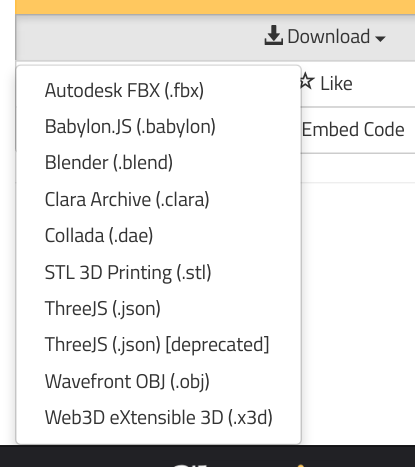
what kind of info do these different formats provide?
there are lots of things that can be included in a file that calls itself a mesh. the important thing is to think about what kind of info we want if we want to display the 3D object described by the mesh: the positions and the cells.
https://www.npmjs.com/package/obj2sc converts .obj files to a js object
that you can require like the skelly.json in the examples above.
in blender you can load a mesh in one format and save it as another (eg .blend to .obj). with this technique though, you can only process one mesh at a time, and you have to get blender working as well.
where is my mesh?
when you finally get your program working, your mesh may be super tiny or extremely large. there are a few things you can do to get it to look good.
- when your scene loads, if it's all black or if you see a part of the model, zoom in and out and rotate around the scene to see if you can find or see any part of the model. note: you may be inside the model, so make sure to zoom out.
- check the
centeranddistanceproperties on the camera. - you can use
gl-mat4.scalein the model matrix (where you usegl-mat4.identity) to scale the model.
watch out for very large meshes
some meshes contain loads and loads of points. i once downloaded a mesh of a supernova from nasa. the file itself was huge & i wasn't even able to render it because it crashed my program.
there are many techniques for simplifying meshes, but that's outside the scope of this article.
holes
sometimes you might get a mesh from somewhere but when you render it, it's full of holes:
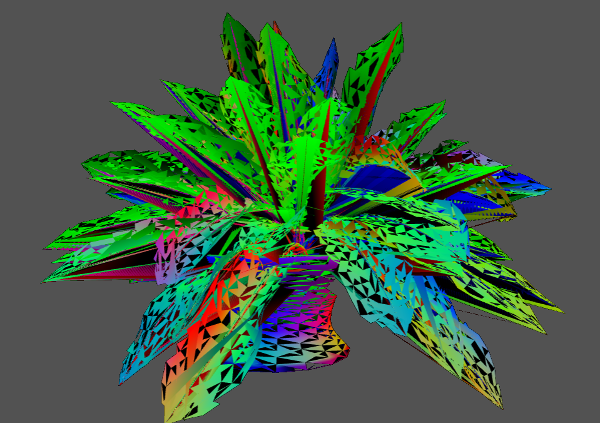
although i haven't tried it, https://github.com/mikolalysenko/mesh-fixer may be able to help you.
sometimes you get holes when the mesh includes cells made of 4 ("quads") or even 5 elements. regl expects 3-element cells (triangles), so if you notice holes that are quadrilaterals or pentagons, you'll have to triangulate ("turn something into a triangle") it.
additional data in mesh files
if you get your 3d model from a website like clara.io, it may come in a zip file that may include .mtl and/or .png files along with the .obj (or whatever other file format) you want. those files are used to render textures. so unless you're dealing with textures, you can ignore them.
sometimes you can download something called three.js json or three.js json
(deprecated). these files may have cell and position data in them, but they
will also have other things that three.js wants, so you'll have to root around
and find the cell and position data yourself. note: i haven't tried this.
licenses
many sites provide scanty or no copyright/license/terms of use. if you want to use a mesh you find, make sure that you have the right to use it in the way you plan on using it. if you can't find the info, assume it's not useable.
final notes
For posterity, here are the versions of the packages used in this tutorial:
{
  "dependencies": {
    "angle-normals": "^1.0.0",
    "gl-mat4": "^1.1.4",
    "regl": "^1.3.0",
    "regl-camera": "^1.1.0"
  },
  "devDependencies": {
    "browserify": "^13.1.1",
    "budo": "^9.2.1",
    "indexhtmlify": "^1.3.1"
  }
}
i hope you found this tutorial helpful! if you have any feedback, feel free to let me know: @marinakukso.
further learning
- regl
- the regl api
- from nothing to something in webgl using regl by ricky reusser
- fun with webgl - talk by james halliday
- introducing regl - talk by mikola lysenko